Magic Login Registration provides flexible and user-friendly ways to register users on your WordPress site without passwords. Whether you need automatic onboarding, a standard registration form, or a fully custom solution, Magic Login Pro integrates seamlessly with your existing magic link login workflow — allowing new users to sign up and log in effortlessly via email.
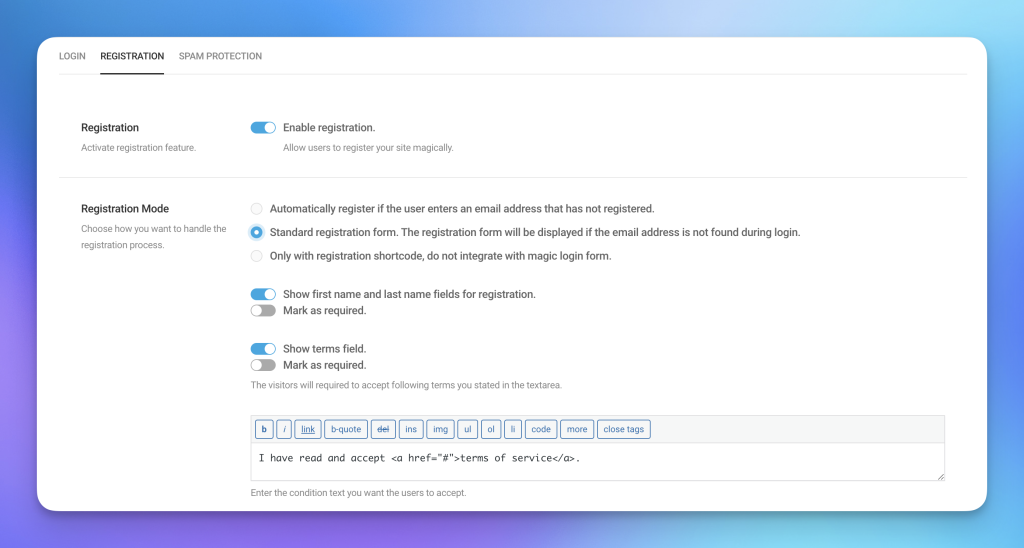
Registration Mode #
3 different registration modes are available with Magic Login Pro.
1) Automatic registration
With automatic registration mode, users are not disturbed when attempting to log in. If the provided email address does not match any registered users, the system will automatically register the user. However, since Magic Login works with both email and username by default, you might prefer to display a small registration form to collect the user’s email address. Magic Login Pro offers an additional option to control this behavior, allowing you to choose whether to display a form with an email field or skip the registration process for such requests.
2) Standard registration
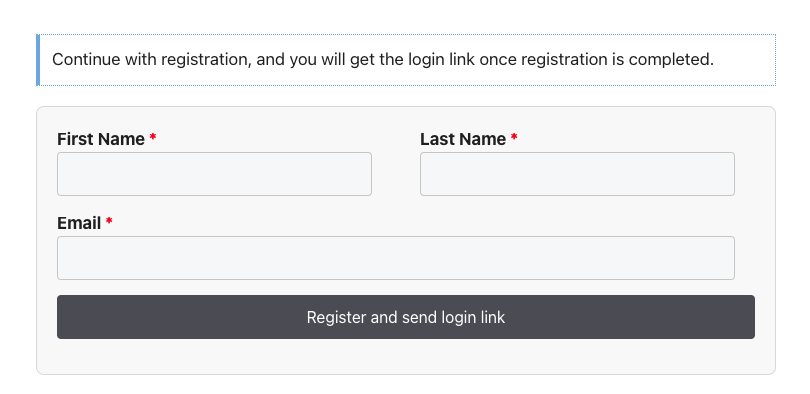
Standard registration is a great way to collect basic user details and integrates seamlessly with the magic login form. If a user’s email doesn’t match any existing accounts when requesting a login link, they will be directed to the registration form as the next step. In standard registration mode, you can request the user’s first and last name and ask them to accept the terms and conditions before proceeding with registration.
3) Registration with shortcode
If you want the registration process to be independent of the magic login, you can use the third option. Simply use the registration shortcode and attributes to display the registration form.
For instance:
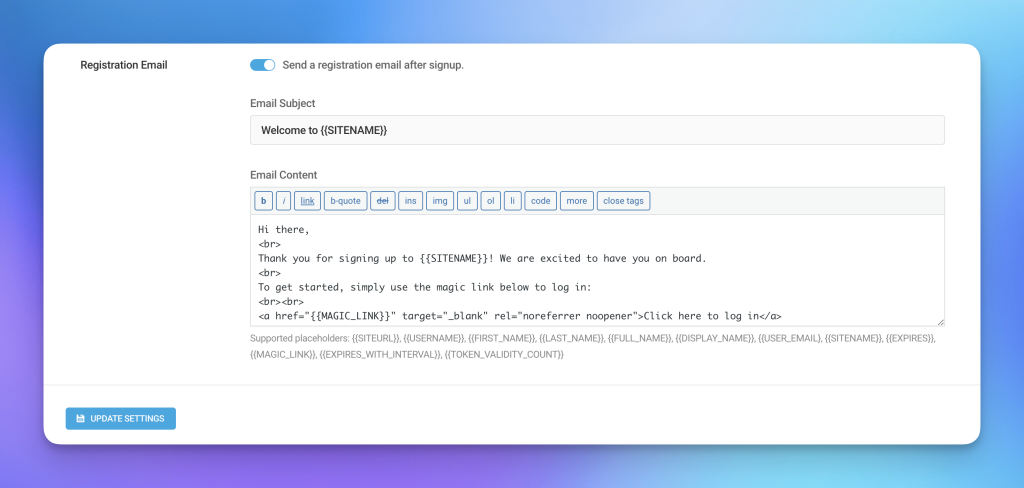
[magic_login_registration_form show_name="true" require_name="true" show_terms="true" require_terms="true" registration_terms="I have read and accept <a href='#terms'> terms </a> " button_text="Complete registration and send login link" info_message="Continue with registration" success_message="Registration successfull, check your inbox for login link"]Registration Email #
You can send registration email easily and it supports all the placeholders to customize email subject or content.
Domain Restriction #
The Domain Restriction feature allows administrators to limit user registrations to specific email domains. When enabled, only users with email addresses belonging to the allowed domains can register. This ensures that only authorized users from certain organizations or companies can create accounts.
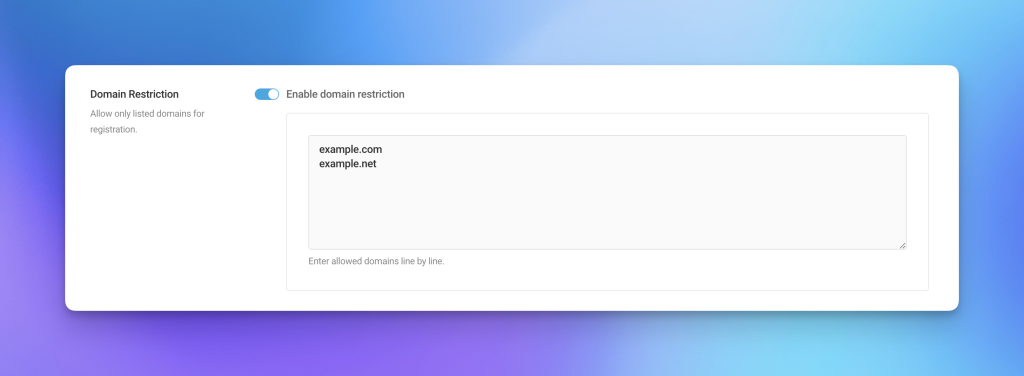
Enabling Domain Restriction #
To enable the domain restriction feature:
- Navigate to the Settings -> Magic Login -> Registration settings page.
- Toggle the Enable domain restriction switch to the “on” position.
- Enter the allowed domain names in the provided text area, with one domain per line (e.g.,
example.com,example.net). - Save the changes.
Once enabled, only users with email addresses matching the listed domains will be allowed to register.
Use Cases #
- Restricting registration to employees of a specific company.
- Limiting access to members of a particular organization.
- Preventing spam or unauthorized signups from external email providers.
Important Notes #
- The system performs a strict domain match, so subdomains (e.g.,
sub.example.com) will not be included unless explicitly listed. - Ensure that the domain list is kept up to date to accommodate changes in organizational email policies.
This feature provides an effective way to maintain control over user registrations and ensure that only authorized users can create accounts on your website.
You can use the magic_login_registration_allowed_domains filter to specify the allowed domains and the magic_login_registration_is_domain_allowed filter to programmatically determine whether a domain is permitted or not.
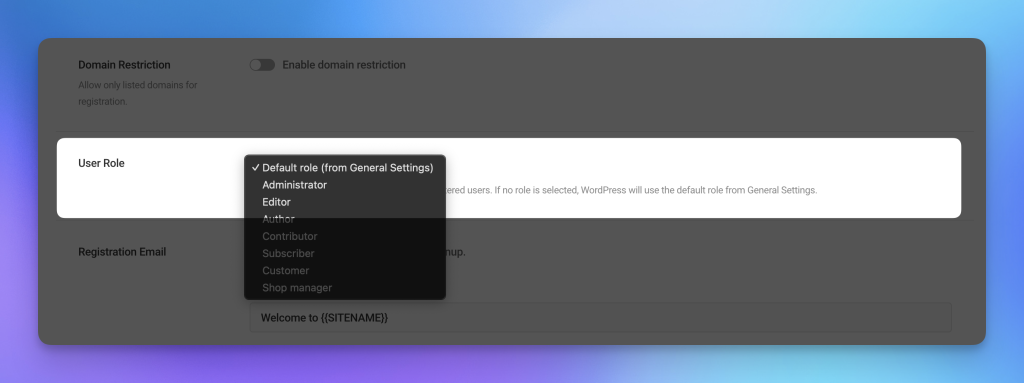
Set User Role #
Magic Login allows you to set a default user role for new registrations, giving you more control over user management. This feature ensures that newly registered users are automatically assigned the appropriate role, streamlining access control and improving site security.
Registration Redirect #
As of version 2.5, Magic Login Pro supports redirecting users to a custom page after registration.
This is useful when you want to:
- Redirect users to a thank-you or onboarding page.
- Send them to a custom dashboard or membership area.
- Trigger additional flows (e.g., surveys, upsells, etc.)
How to Enable #
To configure a redirect after registration:
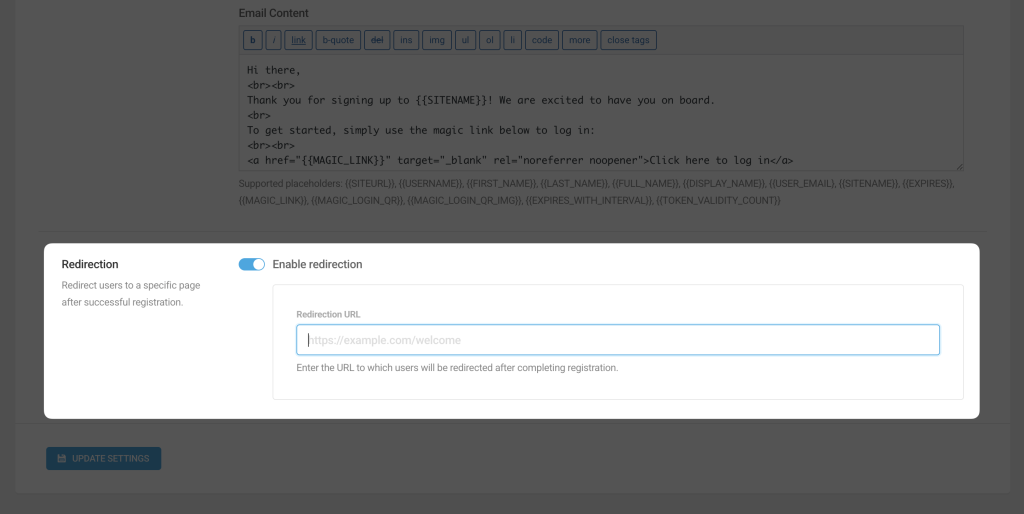
- Go to Settings → Magic Login → Registration tab.
- Enable redirection.
- Enter the full URL where users should be redirected after completing registration.
- Save changes.
Once set, users who successfully register will be redirected to the specified page automatically.
Notes
- This setting works with both standard registration and registration via shortcode.
- It does not apply to automatic registration mode, since users are registered silently without interacting with a registration form.
- You can override the redirect behavior programmatically using the
magic_login_registration_redirect_urlfilter.
Example:
add_filter( 'magic_login_registration_redirect_url', function( $url, $user_id, $userdata ) {
    return 'https://example.com/welcome';
}, 10, 3 );
Customizations #
If you are using a shortcode or automatic integration, the registration shortcode is always running behind the scenes. And it provides enough customizations and flexibility.
Don’t require last name:
add_filter( 'magic_login_registration_form_shortcode_atts', function ( $atts ) {
	$atts['require_last_name'] = false;

	return $atts;
} );
or alternatively you can pass require_last_name=”false” with shortcode.
Adding a custom field:
Let’s say you want to get the phone number with the registration form:
1) Following snippet for the adding a field to form:
/**
 * Add mobile phone field to the registration form.
 */
function my_prefix_add_mobile_phone_field() {
    ?>
    <p>
        <label for="mobile_phone"><?php esc_html_e( 'Mobile Phone', 'magic-login' ); ?></label>
        <input type="text" name="mobile_phone" id="mobile_phone" value="" required>
    </p>
    <?php
}
add_action( 'magic_login_registration_form_before_submit', 'my_prefix_add_mobile_phone_field' );
2) And handling data from backend:
/**
 * Assign phone information to the user after registration.
 *
 * @param int   $user_id  User ID.
 * @param array $userdata User data.
 */
function my_prefix_assign_phone_info( $user_id, $userdata ) {
    if ( isset( $_POST['mobile_phone'] ) ) {
        $mobile_phone = sanitize_text_field( wp_unslash( $_POST['mobile_phone'] ) );
        update_user_meta( $user_id, 'mobile_phone', $mobile_phone );
    }
}
add_action( 'magic_login_registration_after_user_create', 'my_prefix_assign_phone_info', 10, 2 );
The phone number will be saved as user meta.
How to Add a Red Asterisk (*) for Required Fields in Your Magic Login Registration Form #
To enhance the user experience on your Magic Login registration form, you may want to visually indicate which fields are required. A common way to do this is by adding a red asterisk (*) next to the labels of required fields.
The following code snippet demonstrates how you can dynamically add a red asterisk to the required fields in your form using a simple JavaScript solution:
add_action( 'wp_footer', function () {
	?>
    <script>
		document.addEventListener("DOMContentLoaded", function () {
			const requiredFields = document.querySelectorAll("#magic_login_registration_form input[required]");
			requiredFields.forEach(field => {
				const label = document.querySelector(`label[for="${field.id}"]`);
				if (label) {
					label.innerHTML += ' <span style="color: red;">*</span>';
				}
			});
		});
    </script>
	<?php
} );
PS: Registration feature is available since version 2.2+