Skip to content

HandyPlugins

  • Home
  • PluginsExpand
    • Magic Login Pro
    • Handywriter
    • WP Accessibility Toolkit
    • PaddlePress Pro
    • Easy Text-to-Speech
  • Docs
  • About
  • Blog
  • Contact
My Account
HandyPlugins
Popular Search shortcodethehookemailredirect

Magic Login Pro

32
  • Installation & Configuration
  • Use magic login as the default login method?
  • Brute Force Protection
  • WooCommerce Integration
  • Easy Digital Downloads (EDD) Integration
  • Token Lifespan
  • Disable Magic Login for a Specific User
  • Login with Code: Flexible Passcode-Based Authentication
  • SMS Login – Passwordless Authentication with SMS
  • Magic Login REST API
  • CLI Command
  • Add Login form to a Page
  • Reset Tokens
  • Auto Login Links
  • Token Validity
  • Login Redirect
  • Shortcode
  • Login Email Customization
  • Login Request Throttling
  • IP Check
  • Domain Restriction
  • Registration
  • Spam Protection
  • How to Add Magic Login to Any of Outgoing Emails?
  • Customize Default Messages
  • nG Firewall
  • Dynamically Adjust Token TTL
  • How to change Sender Details?
  • Disable Magic Login for specific roles
  • Customizing Login Session Duration
  • Magic Login Twilio Integration
  • Magic Login – FluentCRM Integration

PaddlePress Pro

26
  • Installation & Configuration
  • How does PaddlePress PRO work?
  • Automatic account creation
  • How to set up a membership website?
  • Setup a Development Environment
  • Protect Download Files on NGINX
  • Software Licensing
  • Software Licensing API
  • Updater Implementation for WordPress Plugins
  • Updater Implementation for WordPress Themes
  • Release a New WordPress Product
  • Customer Dashboard (My Account) Page
  • Checkout Buttons
  • Custom Redirect After Successful Checkout
  • How does the domain count?
  • Emails
  • Accessing Readme through a Shortcode
  • How to Sell WordPress Products?
  • Releasing Beta Versions of a WordPress Product
  • Paddle Billing
  • Customer Dashboard
  • Membership Levels
  • Restrict Content
  • Add a Custom Payment Action
  • How to customize “Download” Button?
  • Adding Manual Payments

Handywriter

11
  • Installation & Configuration
  • Write a Blog Post
  • Create a Summary
  • Suggest a Title
  • Keep records of AI generated Contents
  • Grammar & Spelling Fixer
  • Plagiarism Check
  • Content Templates
  • How to create a Meta Description?
  • How to complete a sentence?
  • How does credit calculation work?

Easy Text-to-Speech

5
  • Installation & Configuration
  • Using with Block Editor
  • Using with Classic Editor
  • OpenAI Integration
  • ElevenLabs Integration

WP Accessibility Toolkit

3
  • Customization
  • Hotkeys: Quick Navigation and Efficiency
  • Do not show the accessibility toolkit on the specific page

FAQ

1
  • How to Enter Your VAT Number for VAT Deduction at Checkout
  • Home
  • Docs
  • PaddlePress Pro
  • Installation & Configuration
View Categories

Installation & Configuration

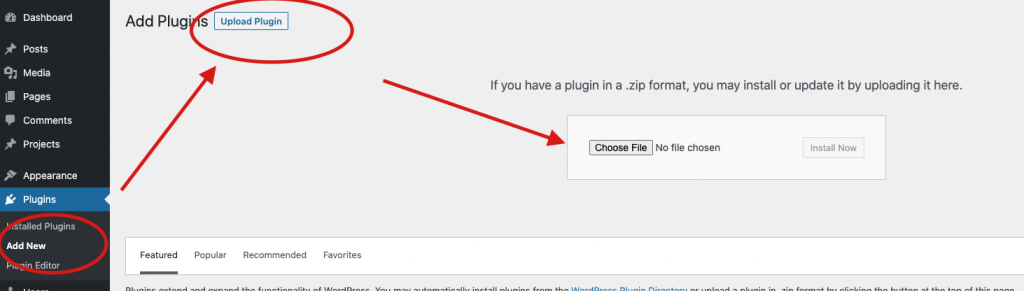
The installation of the PaddlePress PRO is quite straightforward. Download the most recent version of the plugin from your account page and upload it to your WordPress website and then activate it.

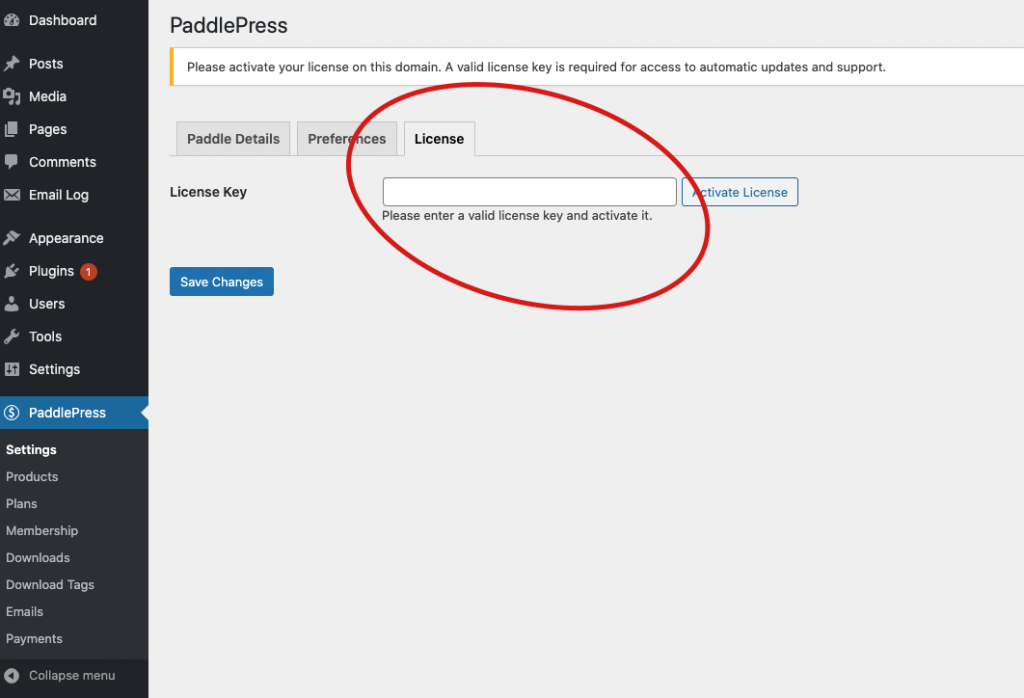
Once the plugin has activated, register your license key to get the advantage of auto-updates for future releases.

Configuration #

Paddle Billing #

If you are using Paddle Billing platform (If you signed up for Paddle after August 8th 2023, you are likely using Paddle Billing) follow these steps:

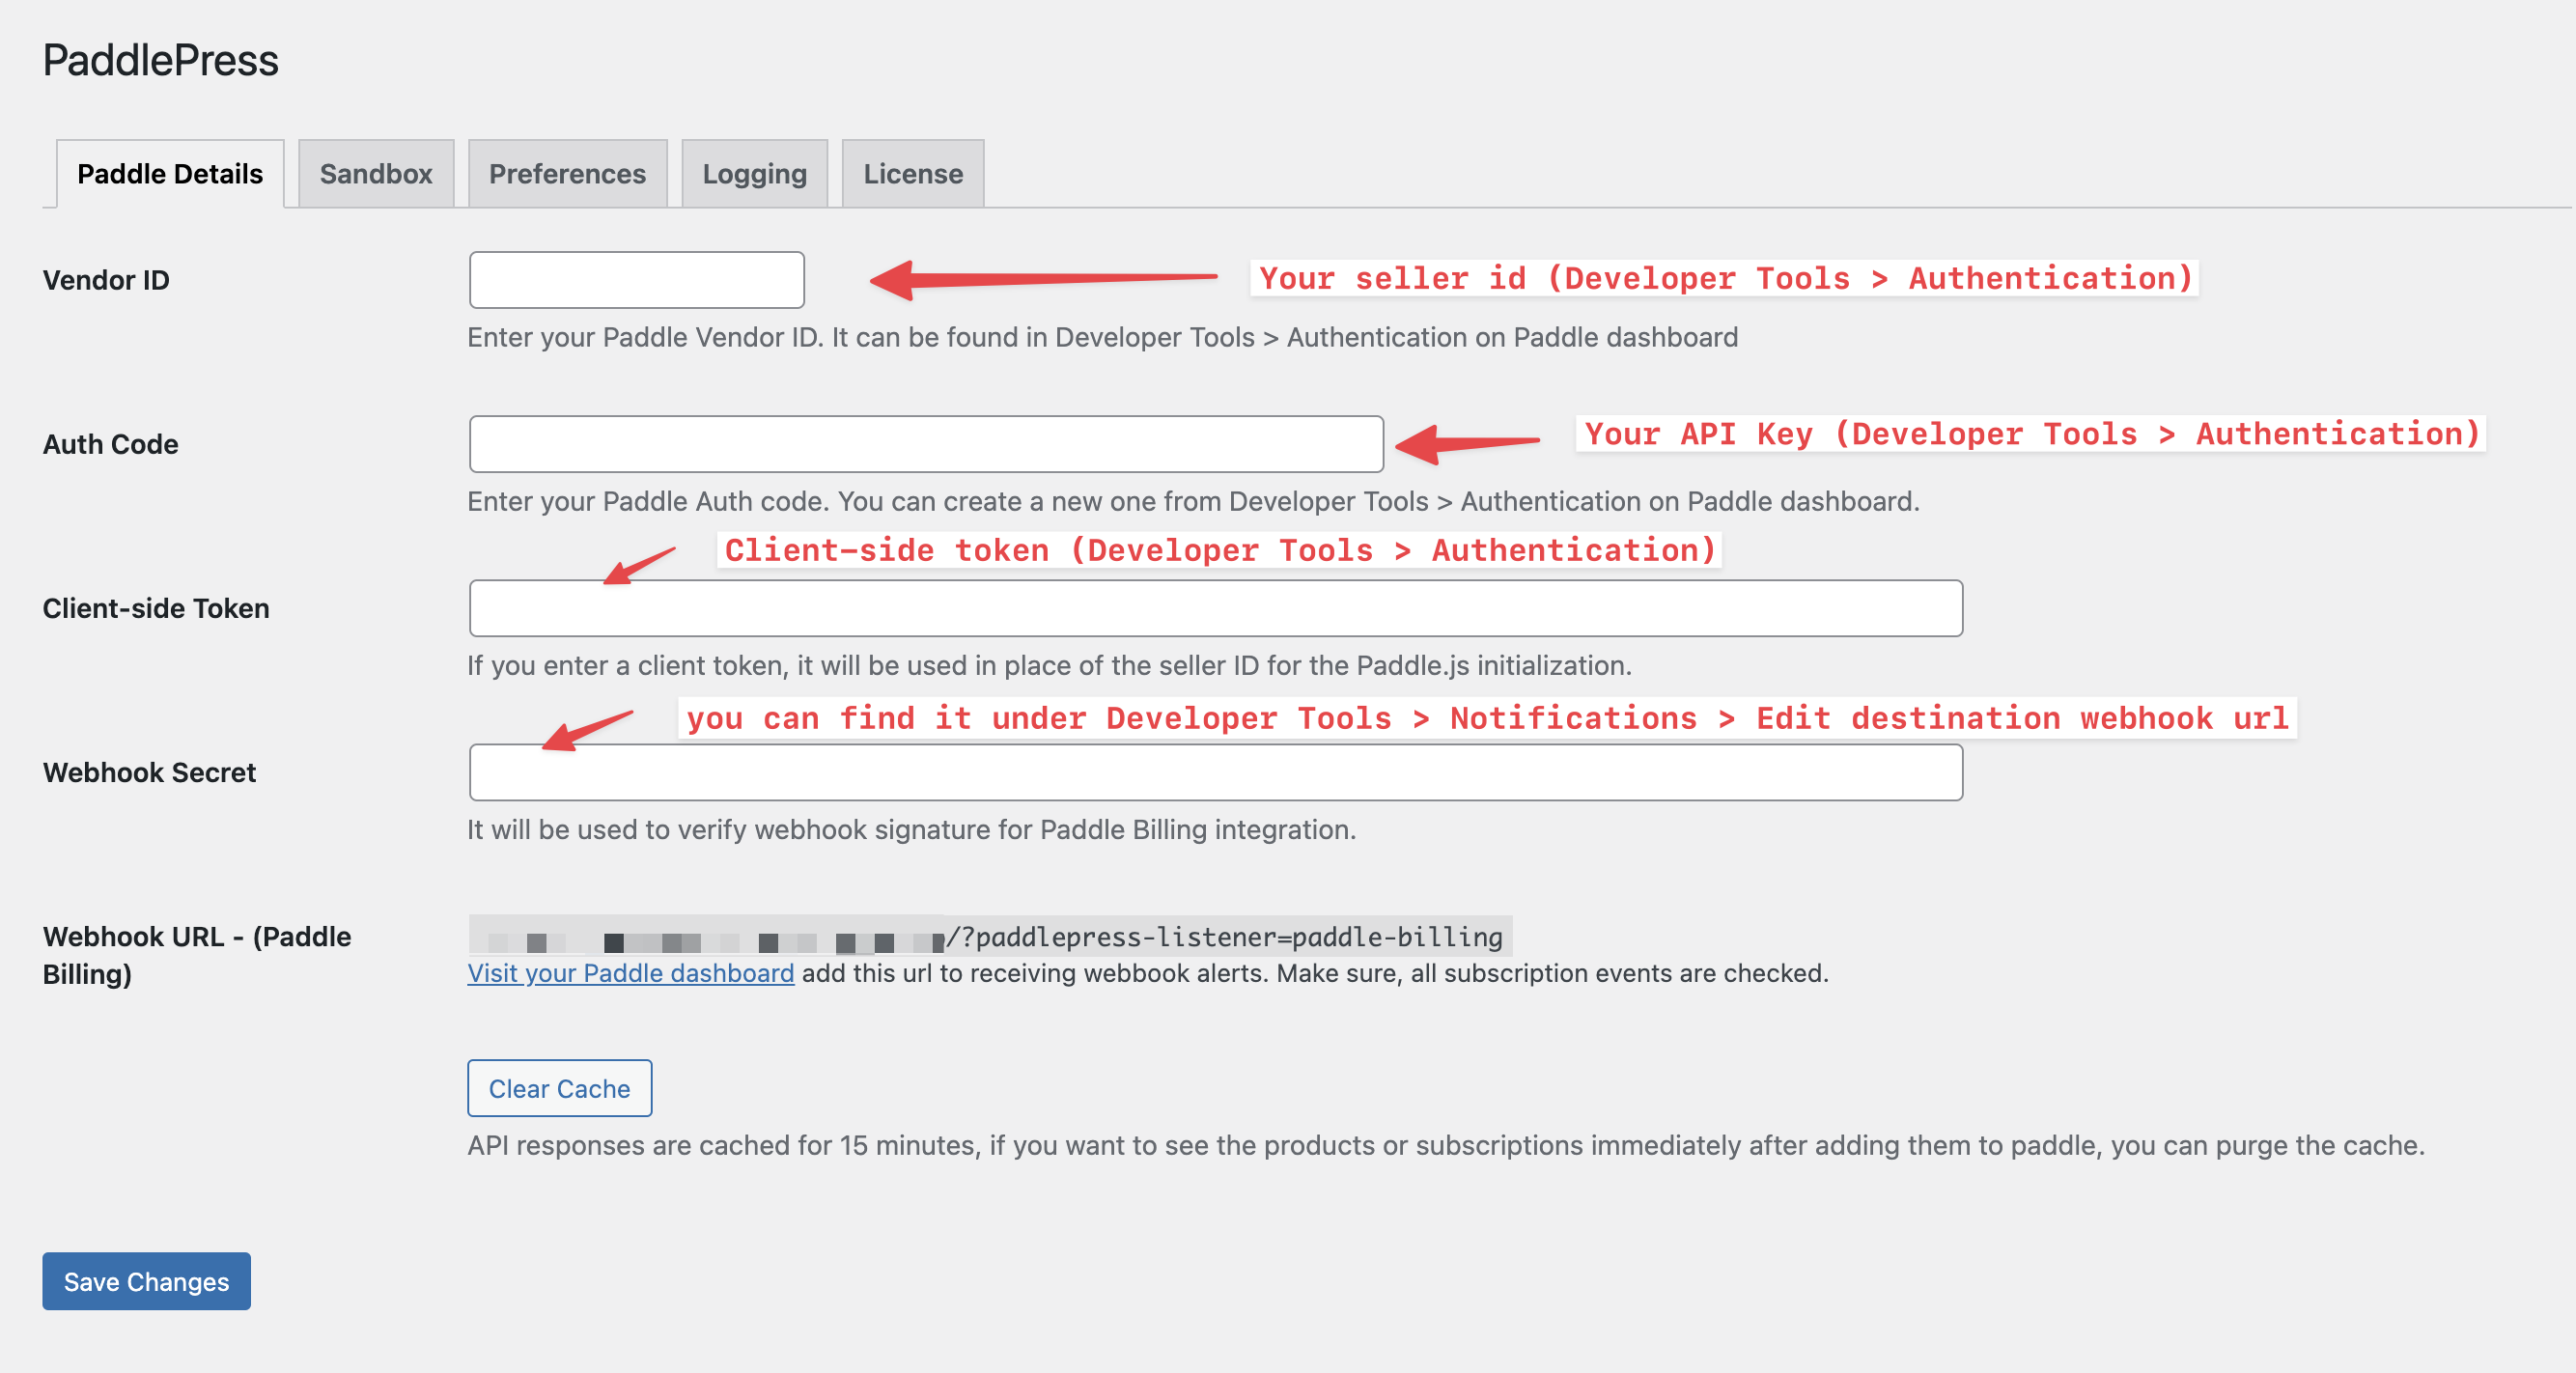
  1. Enter your authentication code. If you prefer to use a client-side token, you can enter it here as well. These details can be found under Developer Tools > Authentication.
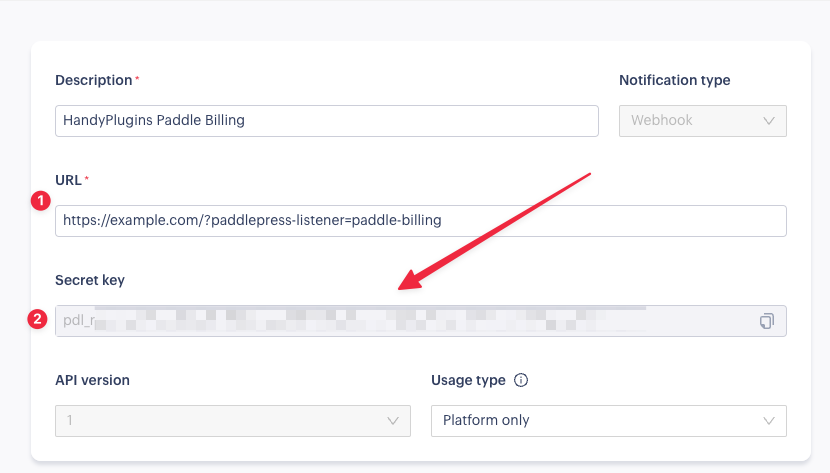
  2. Navigate to Developer Tools > Notifications > New Destination, and set up your webhook URL like it shown here.
  3. Next, enter your webhook secret. To locate it, go to Developer Tools > Notifications.You can view it by clicking the “Edit” button.

Paddle Classic #

  • Enter Paddle details on the plugin settings page. (You can find vendor ID and auth code from https://vendors.paddle.com/authentication)
  • And copy/paste public key from https://vendors.paddle.com/public-key (it is required for webhook signature validation, include —–BEGIN PUBLIC KEY—– and —–END PUBLIC KEY—– ) You don’t need to enter public key if you are using Paddle Billing.
  • Enter payload URL to paddle dashboard and enable webhook for all “subscription” and “one-off” events. (Webhook URL is different for Paddle Billing, if you are using Paddle Billing make sure you entered the right URL along with webhook secret)

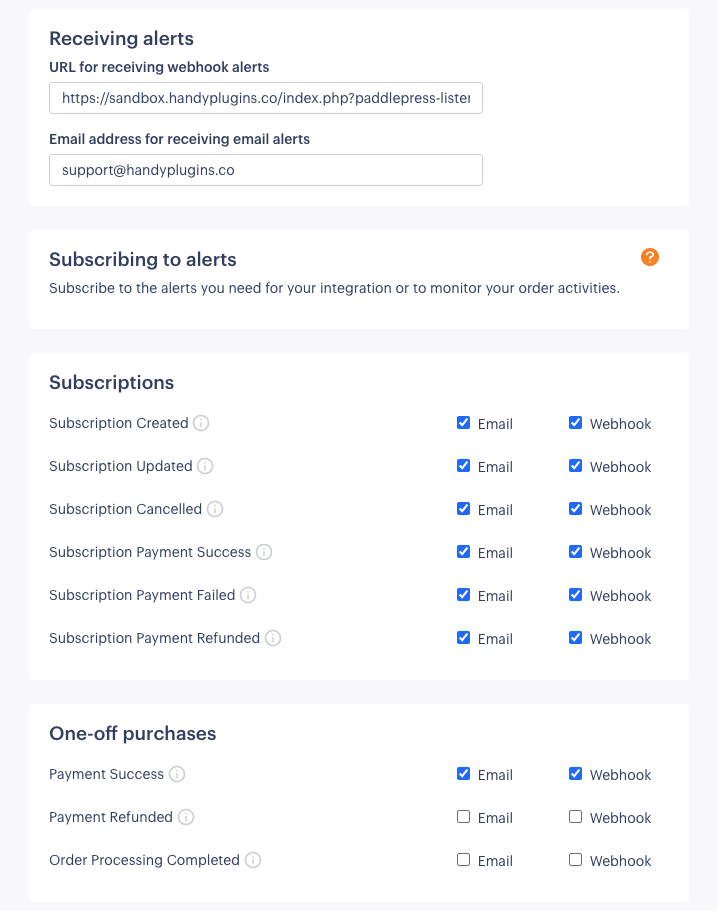
You may also want to get an email once an event happened. (recommended)

Set your default payment link #

  1. To ensure proper functionality, you need to set a default payment link in your Paddle Checkout settings. Follow these steps as outlined in the Paddle documentation:
    • Go to Checkout > Checkout Settings.
    • Locate the Default Payment Link field and enter your desired default link.
    • Save the changes to apply the settings.

This step is crucial to avoid errors during the checkout process. And remember, your website needs to get approved by Paddle before you start using it on live/production environment.

Once you save the settings, that’s all. You are ready to use PaddlePress.

Was this guide helpful for you?
Updated on November 25, 2024
How does PaddlePress PRO work?
Table of Contents
  • Configuration
    • Paddle Billing
    • Paddle Classic
  • Set your default payment link

HandyPlugins

Explore

Home
Blog
Contact Us
My Account

Products

Magic Login Pro
Handywriter
Easy Text-to-Speech
PaddlePress Pro
WP Accessibility Toolkit

Follow Us

Twitter
Facebook
GitHub
WordPress

2025 – HandyPlugins.co | Hosted on WPHandle and optimized with Powered Cache

  • Terms and Conditions
  • Privacy Policy
  • Cookie Policy
  • Home
  • Plugins
    • Magic Login Pro
    • Handywriter
    • WP Accessibility Toolkit
    • PaddlePress Pro
    • Easy Text-to-Speech
  • Docs
  • About
  • Blog
  • Contact
We use cookies to ensure that we give you the best experience on our website. If you continue to use this site we will assume that you are happy with it.OkPrivacy policy